Python Accessing Database Rows
We're going to be placing the database row data into our text boxes and the label. To do that, it's easier to set up some StringVars. In a previous section, you learned how to set up StringVars for Tkinter Widgets. We'll do the same here. That way, we can cut down on the code needed to set and get data from the textboxes.
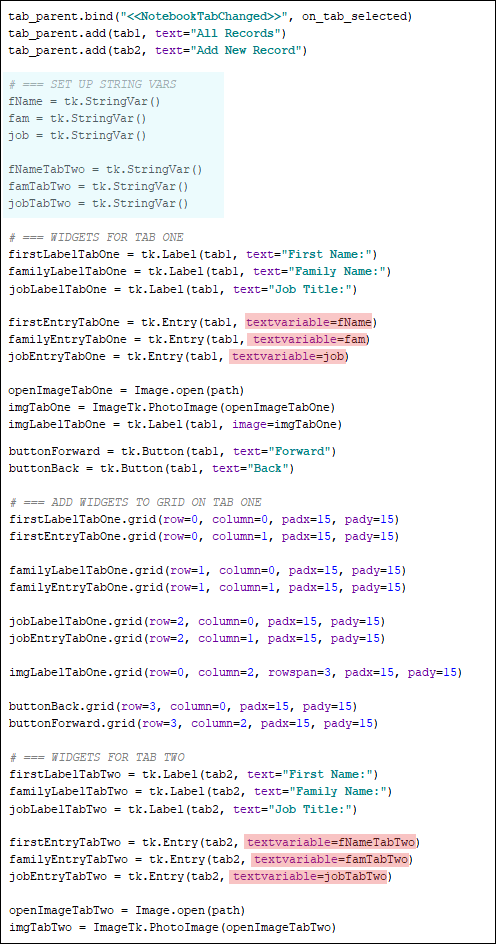
Set up the following String Variables. Add them just after the tab control but before your code that sets up the widgets (see the code screenshot below for the exact placement):
fName = tk.StringVar()
fam = tk.StringVar()
job = tk.StringVar()
fNameTabTwo = tk.StringVar()
famTabTwo = tk.StringVar()
jobTabTwo = tk.StringVar()
For your tab1 Entry text boxes, add the textvariable parameters:
firstEntryTabOne = tk.Entry(tab1, textvariable=fName)
familyEntryTabOne = tk.Entry(tab1, textvariable=fam)
jobEntryTabOne = tk.Entry(tab1, textvariable=job)
Now do the same for the tab2 Entry textboxes
firstEntryTabTwo = tk.Entry(tab2, textvariable=fNameTabTwo)
familyEntryTabTwo = tk.Entry(tab2, textvariable=famTabTwo)
jobEntryTabTwo = tk.Entry(tab2, textvariable=jobTabTwo)
Your code should look like this:
OK, we can now insert the first record onto the form.
Accessing Database Rows in Python
When we connected to our database, we used a cursor to fetch rows back from the table in the database. We placed all of these records in a variable called rows. We now need to get at individual rows and columns.
You can get at an entire row by using square brackets. For example, this would get you the first row from the table:
rows[0]
So the row number you want goes between square brackets. (You need to remember that row 0 is the first row and not row 1.)
You can also specify the column number from your table. Just add another pair of square brackets:
rows[0][0]
The line above means row 0 column 0. For our database table, the rows and columns would look like this:
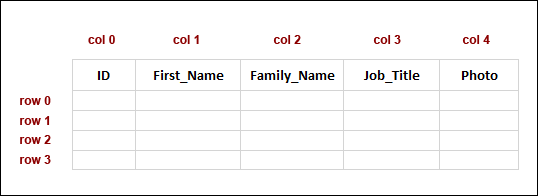
If we wanted to reference the third row in the table and the fifth column, it would be this:
rows[2][4]
Likewise, the second row and the third column would be:
rows[1][2]
We can add our if statement now and load up some records. Add this line just below your success = load_database_results() line:
if success:
As the code for the if statement, add these lines:
if success:
fName.set(rows[0][1])
fam.set(rows[0][2])
job.set(rows[0][3])
Because we have StringVars in place for the Entry textboxes, we only need to use those variables we set up to get at each text box: fName, fam, and job. After a dot, we can then set the text for the Entry textboxes. In between round brackets you type what it is you want for your Entry text box. For us, this is row 0 and columns 1, 2 and 3. We don't need the first column, column 0, as this is the ID column, and we've decided not to display this.
Your code should look like this at the bottom:

You can test your program out, now. When you run it, you should see your form with the first record from the table (if you get an error, make sure you have started your server):
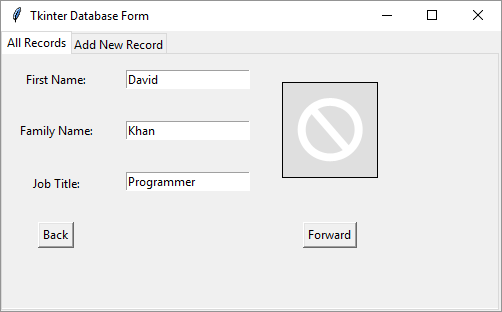
Notice that we still have the default image. We'll fix that. Let's clean up some code, first, though
We're going to need to get an image name and its path from several places in the code. So it's best that we create a function for this, to cut down on code repetition. Add this function to your code, just below the functions you already have:
def image_path(file_path):
open_image = Image.open(file_path)
image = ImageTk.PhotoImage(open_image)
return image
In PyCharm, your code should look something like this, at the top:

But the function returns an image that can be used on a Tkinter label. You've seen this code previously, when we loaded the default image.
Locate these lines in your code:
openImageTabOne = Image.open(path)
imgTabOne = ImageTk.PhotoImage(openImageTabOne)
imgLabelTabOne = tk.Label(tab1, image=imgTabOne)
We can rewrite the first two lines and call our new function. Change the lines to these:
imgTabOne = image_path(path)
imgLabelTabOne = tk.Label(tab1, image=imgTabOne)
Now we only have one line of code to get the image instead of two.
We can do the same for the code that loads the image on tab two. Locate these lines:
openImageTabTwo = Image.open(path)
imgTabTwo = ImageTk.PhotoImage(openImageTabTwo)
imgLabelTabTwo = tk.Label(tab2, image=imgTabTwo)
Change them to this:
imgTabTwo = image_path(path)
imgLabelTabTwo = tk.Label(tab2, image=imgTabTwo)
Run your program. You should find that the default images on tabs one and two still load OK.
Let's load the real image.
Scroll down to the end of your code and locate the success if statement. This is what we have at the moment:
if success:
fName.set(rows[0][1])
fam.set(rows[0][2])
job.set(rows[0][3])
Add this line:
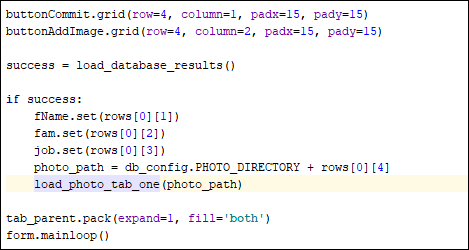
photo_path = db_config.PHOTO_DIRECTORY + rows[0][4]
Add it just below the jobs.set line.
We're getting the photo directory that we set up in our config file. We're then combining that with the actual image name pulled from row 0, column 4 in our database table. That file and its path will be stored in the variable that we've called photo_path.
To insert this image into the label, we'll need another function. Add this near the top of your code, just below your other functions:
def load_photo_tab_one(file_path):
image = image_path(file_path)
imgLabelTabOne.configure(image=image)
imgLabelTabOne.image = image
We've called this function load_photo_tab_one. The first line calls our image_path function to get a file path. The second line is this:
imgLabelTabOne.configure(image=image)
The configure method is used to reconfigure an image. Remember: it has the default image in it, when the program loads. We need to erase this and configure a new one, which will be stored inside of the variable called image. It resets the label.
The third line is this:
imgLabelTabOne.image = image
This line takes care of placing the image inside of the label.
Back to the success if statement. We can call this new function:
load_photo_tab_one(photo_path)
Your if statement should look like this:
And your new function should look like this in PyCharm:

Test it out. Run your program. If you don't connect to the database successfully, you should just see the default image. If you do connect, then you should see the first record, complete with the photo pulled from your photos directory:
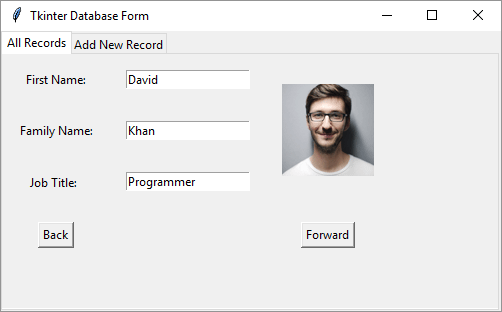
If you're not getting any images, check the path to your photos directory that you set up here, under the Create a Photo Directory heading: Download Photos.
The next thing we need to do is to get those back and forward buttons working. We'll do that in the next lesson.
Scroll Forward through a Database >